Hair Volume: How buns can be created with clip-in extensions
- Irene GilmanEver thought of giving your everyday bun a little extra oomph? Well, you're in luck. Today, we're talking about the not-so-secret trick to adding volume and drama to your buns: clip-in hair extensions. Let's take your bun from basic to breathtaking.
Starting Off: Clip-In Extensions for the Perfect Bun
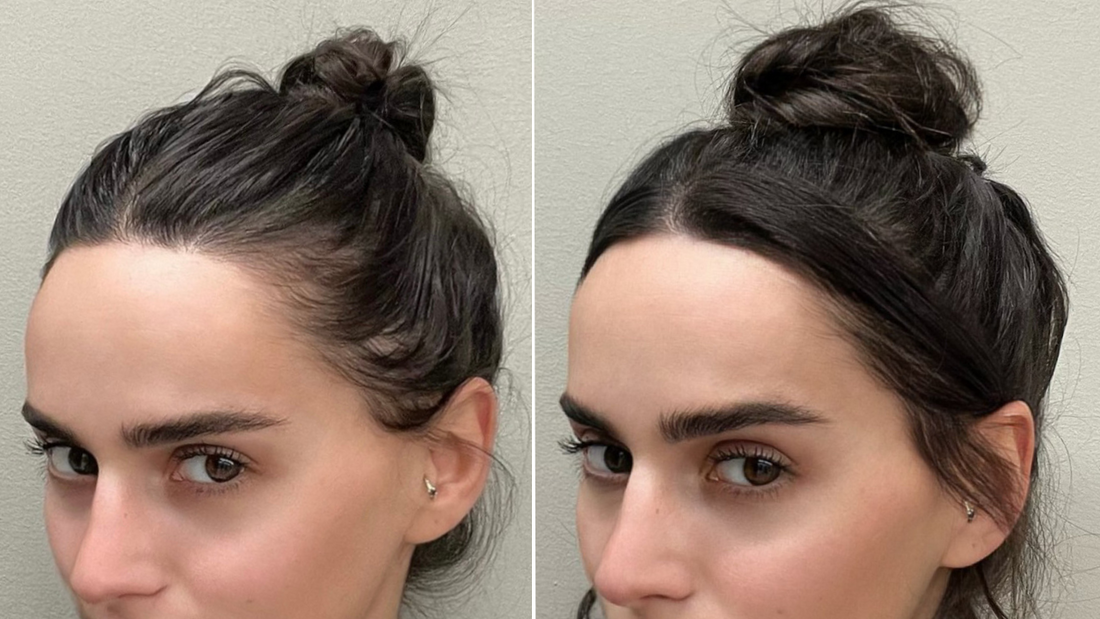
If you've been thinking that you're relegated to small, itty-bitty buns forever, it's time for a delightful change. You can definitely elevate your look with a hair bun with clip in extensions. This isn't just a minor upgrade; it's a complete transformation.
-
Method is key: apply your clip-ins upside down, with the clips facing upwards, and only up to the widest part of your head. This technique isn't just about comfort, it's a game-changer in achieving a bun that's both full and seamless.
Locking Them in!
Creating buns with clip in hair extensions is an art, but keeping them secure is a science. To ensure that your high bun with clip in extensions doesn't unravel as you go about your day, here are essential tips to lock everything in place:
- Start with Texture: Before clipping in your extensions, add some texture to your natural hair with a bit of dry shampoo or texturizing spray. This gives the clips something to hold onto.
- Upside-Down Clipping: For a high bun with clip in extensions, flip the wefts upside down so the clips are facing the right way when your hair is pulled up. This keeps the extensions secure and comfortable.
- Strategic Pinning: Use bobby pins to secure the bun, especially around the base where the extensions are clipped in. Insert the pins through the weft and your hair for a firm hold.
- Hairspray for Grip: A quick spritz of hairspray on the clip area before attaching the extensions can add extra grip. After styling, a final spray will set your look for the day.
And when you choose extensions from Atelier Extensions, you're not just getting style and volume. Their clips are designed with a unique grip that not only prevents slips but also safeguards your hair from damage, ensuring your updo stays pristine and your hair remains protected.
3 Buns you can create while wearing clip-in extensions
The Dream Bun


If the vision of a perfectly styled and voluminous bun has felt out of reach due to naturally thin hair, then consider clip-in extensions your dream come true. With the right technique on how to do a high bun with clip-in extensions, you can achieve the fullness and sophisticated texture that this hairstyle demands. Clip-ins add not only volume but also the illusion of thicker, more luxurious hair. They are the cornerstone for crafting that high bun clip-in extensions look that you've seen and admired.
The Low Elegant Bun


Envision a bun that effortlessly captures the essence of sophistication—the kind that graces the nape with understated glamour. This is the low bun we aim to describe: poised, polished, and perfect for those with an eye for elegance. For those who believe their hair lacks the necessary volume for such a style, clip-in extensions come to the rescue. They are the key to achieving that enviable fullness and a refined shape, adding just the right amount of body to complement the sleekness of the look. With clip-in extensions, you can create a low bun that mirrors the one in the image, turning an everyday hairstyle into an extraordinary statement of grace.
Clip-In Bangs and Bun


This look is where timeless elegance meets edgy sophistication. The high bun paired with clip-in bangs offers a transformative effect, adding both volume on top and a soft frame around the face. For those seeking to replicate this style, the creation of clip-in bangs from a regular weft is a simple DIY task.
Here’s a quick guide:
- Select a clip-in weft that matches the width of your forehead.
- Carefully measure and cut the weft to the length of the bangs you desire.
- Trim the hair to create your preferred bang style - blunt, choppy, or side-swept.
- Attach small clips to the weft if they’re not already in place.
Part your hair where you want the bangs to sit and clip them in, ensuring they blend with your natural hair.
With these easy steps, you can achieve a sophisticated look with a personalized touch, embodying the chic essence of the bun and bangs style shown in the image.
Unwinding with Care: Removing and Storing Your Clip-In Extensions
At the end of a long day, removing your bun is just as important as putting it together. Proper removal and storage of your clip-in extensions are crucial for prolonging their life and keeping them looking their best.
Here's a step-by-step guide to ensure your extensions stay in pristine condition:
Gentle Removal: Start by carefully taking out any bobby pins or hair ties from your bun. Locate the clips of your extensions and gently open them. Avoid pulling or tugging — a smooth upward motion from the clip ends will release them from your hair.
Detangling Before Storage: With the extensions removed, use a wide-tooth comb to gently detangle them. This ensures they are ready to be worn again without any hassle.
Proper Storage: Lay your extensions flat in a storage box or hang them up in a cool, dry place away from sunlight. Storing them properly will prevent tangles and matting, keeping them ready for their next use.
Periodic Maintenance: Every once in a while, treat your extensions to a deep conditioning treatment. This maintains the hair’s moisture balance and keeps the extensions soft and lustrous.
By treating your extensions with care during removal and storage, you ensure that every bun you create looks just as fabulous as the first. Plus, you safeguard your investment, allowing you to enjoy your voluminous, stylish buns for events and everyday wear for years to come. With Atelier Extensions, you receive a storage case to keep you extensions looking great.
Embrace Fuller Buns with Clip-In Extensions
Dreaming of a full, luxurious bun but feel restricted by short or thin hair? Here's where hair extensions play their part. With clip-in buns for short hair, you can step beyond the confines of your natural hair length and embrace a world where voluminous buns are not just possible, but easy to achieve. There's no longer a need to settle for the tiny, lackluster buns you're used to. While you don't have to use extensions all the time, they are an excellent aid if your hair is lacking that natural volume. Learn how to put clip-in hair in a bun, and watch as your styling options expand, allowing you to enjoy the full, eye-catching buns you've always desired.
Atelier Extensions: Your Ideal Choice for Transformative Hair
If you're on the look for the perfect hair extensions to bring your bun dreams to life, look no further than Atelier Extensions. Renowned for their premium quality and seamless blend, these extensions are the go-to for anyone seeking to elevate their hair game. Whether you're aspiring to create fuller buns or just add a touch of glamor to your everyday look, Atelier Extensions offers the versatility and sophistication you need. Their range is not just about enhancing your hairstyle; it's about transforming your entire look with confidence and style. Choose Atelier Extensions for a flawless, voluminous bun that speaks volumes about your personal style.
F.A.Q's
Clip-in extensions add extra hair to your natural strands, which increases both length and volume. When creating a bun, the additional hair from the extensions helps make the bun appear fuller and more voluminous. This is especially useful for those with fine or thin hair who want to achieve a larger, more dramatic bun without using teasing or other volumizing techniques.
For creating buns, it's best to use clip-in extensions that match your hair color and texture. Extensions made from real human hair are ideal because they blend seamlessly with your natural hair and can be styled with heat tools. However, synthetic clip-ins can also be used, especially for temporary styles. Choose extensions with a thicker density to add more volume to your bun.
To prevent slippage, start by sectioning your hair and teasing the roots where the clips will be attached. This creates a secure base for the extensions. Clip the extensions close to the scalp, ensuring they are tight but comfortable. After clipping them in, gather your hair and the extensions together, then twist into a bun. Secure the bun with bobby pins, making sure they go through both your natural hair and the extensions for extra hold.
Yes, clip-in extensions are versatile and can be used for various types of buns. For a sleek bun, smooth your hair and the extensions together, then twist them tightly into a bun. For a messy bun, you can add texture by gently pulling out strands and loosening the bun after securing it. The extensions provide the necessary volume to achieve both styles, allowing for more creativity and variety in your looks.
After wearing clip-in extensions, it's important to remove them carefully to avoid damaging both the extensions and your natural hair. Gently detangle them with a wide-tooth comb, starting from the ends and working your way up. If the extensions are made of human hair, you can wash them with a sulfate-free shampoo and conditioner, then let them air dry. Store them in a cool, dry place, preferably in a protective case, to keep them in good condition for future use.
